

|
| Boro Room -- For Boro-related tips, techniques, and questions. |

2008-07-05, 6:42pm
|
 |
Senior Member
|
|
Join Date: Jun 19, 2008
Posts: 103
|
|
 Tips on dot implosion?
Hey im pretty new to boro - maybe only about 2 weeks... and im having a bit of trouble with the dot implosions that are meant to look somewhat like an "awesome blossom" (hahaha chili's reference ftw)
Anyhoo, it imploding fine, im getting the rounded look but the tips of the imploded dots are pointy, and i would like to see them more rounded -- Ive seen the "rounded tip awesome blossoms" before but i dont know how to make them less pointy
Any suggestions?
|
2008-07-05, 7:06pm
|
 |
Borovangelist
|
|
Join Date: Jan 26, 2007
Location: Auburn, MA
Posts: 3,002
|
|
I'll give you a hint, play with the shapes that you lay down on the maria.
__________________
-Tom
To view links or images in signatures your post count must be 5 or greater. You currently have 0 posts.
|
To view links or images in signatures your post count must be 5 or greater. You currently have 0 posts.
|
To view links or images in signatures your post count must be 5 or greater. You currently have 0 posts.
|
2008-07-06, 6:29am
|
 |
boro color bender
|
|
Join Date: Jun 06, 2005
Location: The Oregon coast!
Posts: 10,039
|
|
If you lay down a small line instead of a dot, you'll get a more rounded tip. Pull a stringer and practice laying down 1/8" lines around the center, but not in the center. The only rule with implosions that you're going to really bloom is to NOT put a dot or line dead center, because it will mushroom when you implode it.  .
__________________
To view links or images in signatures your post count must be 5 or greater. You currently have 0 posts.
To view links or images in signatures your post count must be 5 or greater. You currently have 0 posts.
"Truth is, everybody is going to hurt you; you just gotta find the ones worth suffering for." -Bob Marley
|
2008-07-09, 10:35am
|
 |
Senior Member
|
|
Join Date: Jul 11, 2005
Location: California
Posts: 3,255
|
|
Can someone draw a picture of what you mean. I have a hard time following the directions unless I can see it.  
__________________
To view links or images in signatures your post count must be 5 or greater. You currently have 0 posts.
To view links or images in signatures your post count must be 5 or greater. You currently have 0 posts.
Heidi
To view links or images in signatures your post count must be 5 or greater. You currently have 0 posts.
~~
To view links or images in signatures your post count must be 5 or greater. You currently have 0 posts.
~~
To view links or images in signatures your post count must be 5 or greater. You currently have 0 posts.
|
2008-07-09, 2:31pm
|
 |
ManBearPig
|
|
Join Date: Jun 28, 2005
Location: Roanoke, VA
Posts: 8,540
|
|
Bigger dots = rounder tips.
For example, on this marble the dots were about the size of a dime:
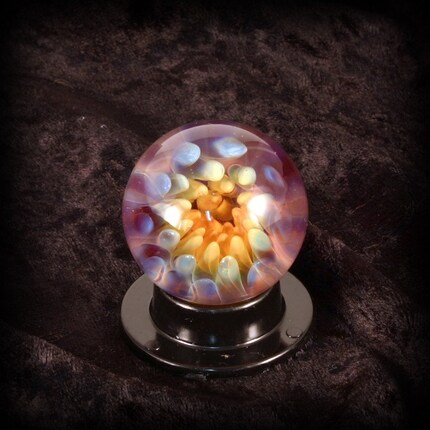
The finished marble is about 1.375" diameter. Granted, that was done on a tube and not a rod, but the same principle applies.
__________________
To view links or images in signatures your post count must be 5 or greater. You currently have 0 posts.
To view links or images in signatures your post count must be 5 or greater. You currently have 0 posts.
To view links or images in signatures your post count must be 5 or greater. You currently have 0 posts.
To view links or images in signatures your post count must be 5 or greater. You currently have 0 posts.
To view links or images in signatures your post count must be 5 or greater. You currently have 0 posts.
|
2008-07-09, 9:39pm
|
 |
Senior Member
|
|
Join Date: Oct 28, 2006
Location: Washington
Posts: 725
|
|
Quote:
Originally Posted by Cosmo

Bigger dots = rounder tips.
For example, on this marble the dots were about the size of a dime:
The finished marble is about 1.375" diameter. Granted, that was done on a tube and not a rod, but the same principle applies. |
curious Cosmo on how you finish the lens from tube to marble. I understand the imploded dot theme in tube but how you gather enough clear for the lens since your working back to open tube? I do inside out work and add a lens that creates a line which needs to be masked with a backing, but it appears this marble is one solid gather. any tips would be great, chance are I see myself trapping an air bubble along the side of the tube trying to gather all that glass back in making a marble. sorry to stray from the thread topic.
__________________
To view links or images in signatures your post count must be 5 or greater. You currently have 0 posts.
To view links or images in signatures your post count must be 5 or greater. You currently have 0 posts.
To view links or images in signatures your post count must be 5 or greater. You currently have 0 posts.
------------------------
Kobuki*Delta Elite*Mirage*Blast Shields*two DeVilbiss 5 LPM* tanks* foot pedal.
|
2008-07-12, 9:59am
|
|
ManBearPig
|
|
Join Date: Jun 28, 2005
Location: Roanoke, VA
Posts: 8,540
|
|
It's easier to show than to put into words, but I'll try...
Once you do the implosion, keep heating and gathering the clear and start shaping it into a rough marble shape.
Get it pretty thick (like about 1/2 or 2/3 of the size of the finished marble) and remove it from the tube. Once you remove it from the tube, you will have a lip of glass around the gather. Heat so that your flame is hitting the inside edge of the lip. Heat slowly and let it gather up to make the lens.
Again, pics would probably explain it better, but alas I don't have any.
I really need to get back to working on that DVD...
__________________
To view links or images in signatures your post count must be 5 or greater. You currently have 0 posts.
To view links or images in signatures your post count must be 5 or greater. You currently have 0 posts.
To view links or images in signatures your post count must be 5 or greater. You currently have 0 posts.
To view links or images in signatures your post count must be 5 or greater. You currently have 0 posts.
To view links or images in signatures your post count must be 5 or greater. You currently have 0 posts.
|
2008-07-12, 9:30pm
|
|
Senior Member
|
|
Join Date: Oct 28, 2006
Location: Washington
Posts: 725
|
|
so same thing you would do with a flip disk? just the remaining tube that you cut away is used as the lens. I always assumed that gathering backing in to the tube might cause a night mare. My flip disk work is just the gather i created from the bubble I applied the design to,when it got down to the tube I would just remove. I'll have to play with this some thanks
__________________
To view links or images in signatures your post count must be 5 or greater. You currently have 0 posts.
To view links or images in signatures your post count must be 5 or greater. You currently have 0 posts.
To view links or images in signatures your post count must be 5 or greater. You currently have 0 posts.
------------------------
Kobuki*Delta Elite*Mirage*Blast Shields*two DeVilbiss 5 LPM* tanks* foot pedal.
|
2008-07-16, 7:56am
|
|
ManBearPig
|
|
Join Date: Jun 28, 2005
Location: Roanoke, VA
Posts: 8,540
|
|
Quote:
Originally Posted by murf
so same thing you would do with a flip disk? just the remaining tube that you cut away is used as the lens. I always assumed that gathering backing in to the tube might cause a night mare. My flip disk work is just the gather i created from the bubble I applied the design to,when it got down to the tube I would just remove. I'll have to play with this some thanks
|
Same thing. At least, the way I do it, it's the same thing. You just have to take your time condensing the front so you don't trap a bubble in the center (unless that's what you're going for). However, if you do trap a bubble, it's usually a small one, so you can usually get it out without hurting the design.
__________________
To view links or images in signatures your post count must be 5 or greater. You currently have 0 posts.
To view links or images in signatures your post count must be 5 or greater. You currently have 0 posts.
To view links or images in signatures your post count must be 5 or greater. You currently have 0 posts.
To view links or images in signatures your post count must be 5 or greater. You currently have 0 posts.
To view links or images in signatures your post count must be 5 or greater. You currently have 0 posts.
|
2008-07-21, 7:31am
|
|
Senior Member
|
|
Join Date: Mar 07, 2006
Location: Southwestern NH
Posts: 791
|
|
Huh,- nice marble by the way Cosmo - I was taught to super heat the the tubing and suck the air out to form the lens, once the implosion was on the inside. Gave me the heebee geebees I must say, but it worked. I think I will try it your way next. Thanks!
Sals
__________________
Phantom + 10LPM Regalia + propane
|
2008-07-26, 2:12pm
|
 |
Star Traveling Super Hero
|
|
Join Date: Jul 20, 2008
Location: Lansing, Michigan
Posts: 87
|
|
yeah, condensing is 1) safer 2) more controlled, as apposed to sucking. Man I wish I had time to do marbles... ah but business is business yeah, love your flipped marb cosmo. I should stay up tonight and pull out one of my 44m and do an doozy to throw back up here  you seem to be a never ending inspiration cos.
__________________
I've Got Blistas On Mah Fingas!!!
Carlisle CC on compressed o2 with a tranny pedal
(Otherwise known as a Scream'n he-she)
Im on
To view links or images in signatures your post count must be 5 or greater. You currently have 0 posts.
now!!!!!!
|
|
Currently Active Users Viewing This Thread: 1 (0 members and 1 guests)
|
|
|
 Posting Rules
|
You may not post new threads
You may not post replies
You may not post attachments
You may not edit your posts
HTML code is Off
|
|
|
All times are GMT -7. The time now is 6:52am.
|


