

|

2013-05-05, 10:12pm
|
 |
Member
|
|
Join Date: Nov 10, 2012
Posts: 64
|
|

Update from the bench...So far it's not going much better than before. Even if I am able to lay down nice, even stringer lines, they seem to be balling up before they actually melt in all the way, leaving me with globs instead of petals. As the glass starts to sink into the clear, the lines gather themselves from the center high point of each line, and if I flatten the maria to try to maintain the shape of the line, it blurs, even with very gentle pressure. On top of that, when I get it all compressed, the clear lens seems to press down on the flower from the top and smoosh the colors all into a flat plane when I go to shape the bottom.
I'm obviously not expecting an instant miracle, but it's a little confounding because I've practiced most of the techniques involved for quite some time; compression/implosion is not a new concept to me, and I've made hundreds of pendants and marbles with murrini, dot patterns, and frit. But when I look at the lacy, delicate and well defined petals and leaves you folks have achieved, I think there must be a basic glass mismanagement issue going on here. What am I missing - any further suggestions?
Thanks
Martha

|
2013-05-06, 7:08am
|
 |
Flamewoman
|
|
Join Date: Jan 12, 2007
Location: California
Posts: 985
|
|
Martha some glasses will do that ball up thing more than others. Do you have a color that is cooperative for you? practice with that one till you get happy with what you get. I have a feeling the problem for you is your angle of maria in the flame, and where you are concentrating the heat. This is nothing I can describe here, It's better learned in a class where someone can show you what to do. Where do you live? Can you take a class? One class changed my life. if it's the right class, it will for you too.
__________________
Mary K
GTT Sidewinder & 3 Regalias
To view links or images in signatures your post count must be 5 or greater. You currently have 0 posts.
You cannot do a kindness too soon, for you never
know how soon it will be too late.
To view links or images in signatures your post count must be 5 or greater. You currently have 0 posts.
PLEASE like my page!
|
2013-05-06, 8:01am
|
 |
Now part of the Dark Side
|
|
Join Date: Jul 02, 2010
Location: North Central PA
Posts: 966
|
|
Try getting your maria a little hotter so that the stringer sticks to it, that wa it won't ball up when you add the heat.
__________________
Roy
Hot glass does not crack.
Unless it is glowing and drippy, hot glass looks like cold glass.
|
2013-05-07, 4:00am
|
|
Member
|
|
Join Date: Nov 10, 2012
Posts: 64
|
|
Thank you both for your advice. Next time I will focus on the maria, keeping it hotter when I apply the stringer, and trying different angles and approaches to concentrating the flame while compressing. It just occurred to me that laying down a really stiff transparent, such as Turbo Amethyst, for the first petal layer would probably help with the balling up problem.
The next class I'm saving my shekels for is Sally Prasch - neon sculpture, tube bending and lathework. So I doubt we will be doing floral compressions in that one, although a class is always a good opportunity to learn all sorts of unexpected stuff.
Thanks again,
Martha
|
2013-05-07, 4:54pm
|
|
Flamewoman
|
|
Join Date: Jan 12, 2007
Location: California
Posts: 985
|
|
I would not recomend Turbo amethyst for a petal alone, you will not see it when thinned that much, it will pretty much dissapear. At least the Turbo amethyst I have would. Your balling up is just as Roy says, try flashing the area where your petal will go with your flame heating it up a bit, before applying the stringer. With more experience you will work faster, and you won't need this as much, but always a good habit to keep your maria hot. You can make a lovely petal by taking a teal color, aqua azul or any and coat about an inch of it with the turbo amethyst and pull that out thin, makes very nice petals that are easy to work. Will give edges of petals a dark outlined look, nice.
__________________
Mary K
GTT Sidewinder & 3 Regalias
To view links or images in signatures your post count must be 5 or greater. You currently have 0 posts.
You cannot do a kindness too soon, for you never
know how soon it will be too late.
To view links or images in signatures your post count must be 5 or greater. You currently have 0 posts.
PLEASE like my page!
|
2013-05-09, 2:40pm
|
|
Member
|
|
Join Date: Nov 10, 2012
Posts: 64
|
|
Mary
I didn't realize you had made this last post!
Thanks for the color advice. I work a lot with Star White encased with DAP and any color encased with Warm Yellow, so many of my floral petal attempts had these elements. I like the Turbo over Aqua! Weirdly when I tried the suggested recipe from your pendant from above, the Lokis made the Violet Hue kind of wash out. Still looked nice, though very pastel compared to just the Violet on its own which went red.
Perhaps I'm trying to melt everything in too quickly. When I have a chance to try it again, I will see what happens if I go super slow. In general I have been trying to work faster these days. Maybe I was rushing it subconsciously.
Martha
|
2013-05-09, 2:52pm
|
|
Flamewoman
|
|
Join Date: Jan 12, 2007
Location: California
Posts: 985
|
|
Pictures Martha! would love to see what you are doing!
__________________
Mary K
GTT Sidewinder & 3 Regalias
To view links or images in signatures your post count must be 5 or greater. You currently have 0 posts.
You cannot do a kindness too soon, for you never
know how soon it will be too late.
To view links or images in signatures your post count must be 5 or greater. You currently have 0 posts.
PLEASE like my page!
|
2013-05-10, 6:42pm
|
|
Flamewoman
|
|
Join Date: Jan 12, 2007
Location: California
Posts: 985
|
|
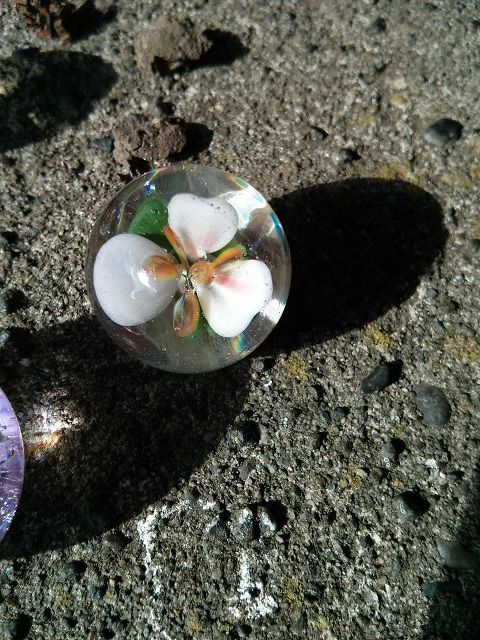
Here are some from today
These turned out very colorfull.


These are not photoshopped in any way.
I don't knowhow to photo shop anyway.
__________________
Mary K
GTT Sidewinder & 3 Regalias
To view links or images in signatures your post count must be 5 or greater. You currently have 0 posts.
You cannot do a kindness too soon, for you never
know how soon it will be too late.
To view links or images in signatures your post count must be 5 or greater. You currently have 0 posts.
PLEASE like my page!
|
2013-05-11, 4:59am
|
 |
Senior Member
|
|
Join Date: Oct 06, 2008
Location: SE PA
Posts: 1,996
|
|
Gorgeous Mary. Love the striped petals especially!!
__________________
Laura
To view links or images in signatures your post count must be 5 or greater. You currently have 0 posts.
|
2013-05-12, 10:13am
|
|
Senior Member
|
|
Join Date: Jan 29, 2009
Posts: 1,958
|
|
Beautiful
__________________
To view links or images in signatures your post count must be 5 or greater. You currently have 0 posts.
To view links or images in signatures your post count must be 5 or greater. You currently have 0 posts.
To view links or images in signatures your post count must be 5 or greater. You currently have 0 posts.
|
2013-05-14, 8:08am
|
|
Furball
|
|
Join Date: May 29, 2006
Location: Poconos
Posts: 93
|
|
My biggest question is how do you get such depth using rod. I'm only able to get real depth with tubing. I think it's in how I compress it. I am nver sure exactly the right compression/implosion technique to do. I usually hold my rod paralell to my table and just let the heat and rotation do the work. I know some people heat their worked maria and keep pressing in the color. Some do it at a 45 degree angle and some do it perpendiclular to their table. Not exactly sure how to get the most depth. Any suggestions.
|
2013-05-14, 9:22am
|
 |
Senior Member
|
|
Join Date: Mar 14, 2012
Location: Bennington, VT
Posts: 1,776
|
|
one of the most important things when doing compression flowers is to have a large, thin maria. the thinner the maria, the deeper the implosion.
also don't press/marver it too much....just enough to keep the dimple of death off of the maria. if you compress too much your flower (or whatever design your imploding) will look "squashed".
__________________
now i've got a Mirage
To view links or images in signatures your post count must be 5 or greater. You currently have 0 posts.
|
2013-05-14, 12:50pm
|
|
Flamewoman
|
|
Join Date: Jan 12, 2007
Location: California
Posts: 985
|
|
Lol istandalone "the dimple of death"
I say "Fear not the dimple of death" easy to remedy that once you know how.
Try this: Do just a clear maria, no design, no nothing on it. Melt it so you get this dimple of death going. Forgive crude drawings, this is susposed to
represent that indentation, not a dog bone.

Now change the angle of your maria holding the rod that the maria is on at angle so that the flame and gravity pulls glass out to the side of the maria
,then finish with flame on the center again to tighten it all up.

Once you master this, you will never, ever get that dimple of death again, and you will be able to add more layers and get things to tighten up better
with more control.
__________________
Mary K
GTT Sidewinder & 3 Regalias
To view links or images in signatures your post count must be 5 or greater. You currently have 0 posts.
You cannot do a kindness too soon, for you never
know how soon it will be too late.
To view links or images in signatures your post count must be 5 or greater. You currently have 0 posts.
PLEASE like my page!
|
2013-05-14, 4:27pm
|
|
Flamewoman
|
|
Join Date: Jan 12, 2007
Location: California
Posts: 985
|
|
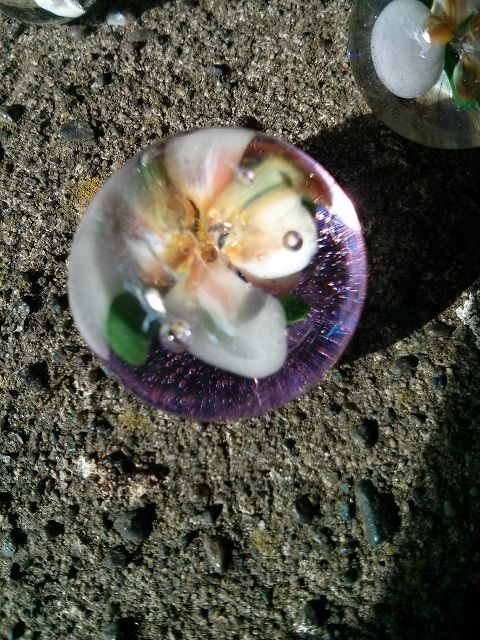
This morning
Here is one from this morning. Hyacinth for inner petals, and my secret weapon for outter petals, MP blue treasure twisted and pulled out thin.
Love MP glass, saves me lots of time and beautiful and easy to work with.

__________________
Mary K
GTT Sidewinder & 3 Regalias
To view links or images in signatures your post count must be 5 or greater. You currently have 0 posts.
You cannot do a kindness too soon, for you never
know how soon it will be too late.
To view links or images in signatures your post count must be 5 or greater. You currently have 0 posts.
PLEASE like my page!
|
2013-05-14, 10:43pm
|
 |
Member
|
|
Join Date: May 10, 2013
Location: seattle
Posts: 80
|
|
That is really beautiful!
I have been trying these. Just started flameworking recently and love it so far. I have been making one of these each time I go to the studio. Still having a really hard time drawing the lines on. Getting a little better but trying to control that tiny stringer without it melting all over is tough! Really impressive control you folks have. The middle one got off center and started getting smashed. Anyhow going to keep trying.
|
2013-05-15, 2:45am
|
|
Senior Member
|
|
Join Date: Mar 14, 2012
Location: Bennington, VT
Posts: 1,776
|
|
Quote:
Originally Posted by Mary K

Lol istandalone "the dimple of death"
I say "Fear not the dimple of death" easy to remedy that once you know how.
Try this: Do just a clear maria, no design, no nothing on it. Melt it so you get this dimple of death going. Forgive crude drawings, this is susposed to
represent that indentation, not a dog bone.
Now change the angle of your maria holding the rod that the maria is on at angle so that the flame and gravity pulls glass out to the side of the maria
,then finish with flame on the center again to tighten it all up.
Once you master this, you will never, ever get that dimple of death again, and you will be able to add more layers and get things to tighten up better
with more control. |
thanks! i've been having a rough time with florals this year.....not making any from november to april got me a bit rusty.
__________________
now i've got a Mirage
To view links or images in signatures your post count must be 5 or greater. You currently have 0 posts.
|
2013-05-15, 6:16am
|
|
Senior Member
|
|
Join Date: Oct 06, 2008
Location: SE PA
Posts: 1,996
|
|
Another option for dimple of death is to uses a small dia. rod (I use a 3mm) and heat and gently pull the glass to the middle to close the flower base and dimple. This is actually a John Kobuki trick that was shared previously.
__________________
Laura
To view links or images in signatures your post count must be 5 or greater. You currently have 0 posts.
|
2013-05-15, 6:17am
|
|
Senior Member
|
|
Join Date: Oct 06, 2008
Location: SE PA
Posts: 1,996
|
|
Love all the pictures. If I ever get a sunny day ... I take some and post what I have been working on.
__________________
Laura
To view links or images in signatures your post count must be 5 or greater. You currently have 0 posts.
|
2013-05-15, 6:42am
|
|
Flamewoman
|
|
Join Date: Jan 12, 2007
Location: California
Posts: 985
|
|
Would love to see some pictures from you Laura!
I used to do as you pointed out - the small diameter rod in devit to pull it out, until I got the hang of using gravity and heat to pull it out. Sometimes I also just put a blob of clear in the hole (dimple) and pull that off with my small paddle mashers. The cleanest method of compression, that doesn't distort my design, for me is just using heat and gravity.
Thanks Will.T for your pictures, please keep sharing. Looks like you have a good start, can be frustrating when you are first learning. If you ever get an opportunity to take a class with John Kobuki, you should. Meanwhile just keep melting glass, the more you practice the more control you will have.
__________________
Mary K
GTT Sidewinder & 3 Regalias
To view links or images in signatures your post count must be 5 or greater. You currently have 0 posts.
You cannot do a kindness too soon, for you never
know how soon it will be too late.
To view links or images in signatures your post count must be 5 or greater. You currently have 0 posts.
PLEASE like my page!
|
2013-05-16, 4:02am
|
|
Member
|
|
Join Date: Nov 10, 2012
Posts: 64
|
|
Mary
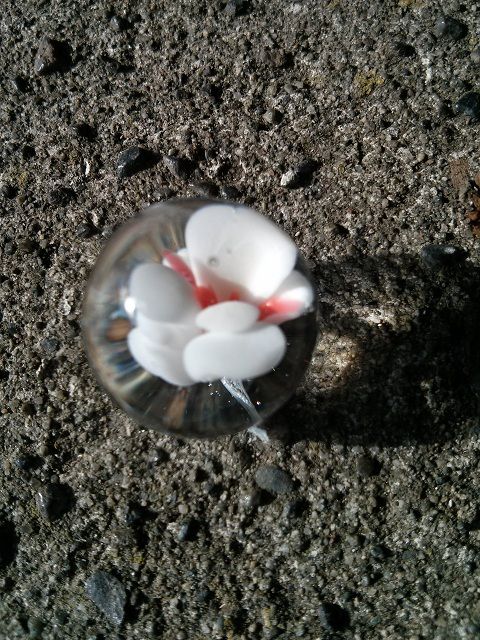
I know you asked for pictures, Sorry it took me so long, I haven't had my photography stuff set up this week. I just got a new torch, so I'm spending every waking moment in the studio. So I just snapped a few with my cell phone. They're not terrible for cell phone macros, actually, but the work is pretty rough.
Here are two that were really globby-

And here are the only two that I thought were somewhat worthy of public viewing-


...I have a lot of practicing to do before I get any real control...
And just for fun here are some tube implosions I did around the same time-

Thanks for all your help!
-Martha
|
2013-05-16, 4:11am
|
|
Member
|
|
Join Date: Nov 10, 2012
Posts: 64
|
|
Istandalone, how do you get your big, thin maria? Any particular method/tricks? For me, the bigger it gets, the thicker it is. I've tried mashing it all around the edge, but that just ends in a hot mess.
|
2013-05-16, 8:05am
|
|
Member
|
|
Join Date: May 10, 2013
Location: seattle
Posts: 80
|
|
Martha, I think those look great! Can I ask what you mean by tube implosion? I really like the yellow one.
|
2013-05-16, 9:08am
|
|
Senior Member
|
|
Join Date: Oct 06, 2008
Location: SE PA
Posts: 1,996
|
|
Hey Will ... welcome!! 
Tube implosion vs. Maria compression
Take a tube, pull a point, heat and blow bubble, decorate said bubble with dots and squiggles and implode it onto itself. Implosion pendants and marbles are made this way.
Many use implosion for the term for what is actually a maria compression as described earlier in the thread.
And I agree ... I think they look great. I can't do a tube implosion that looks half as good as that to save my life. So for now, I stick with the compression method.
__________________
Laura
To view links or images in signatures your post count must be 5 or greater. You currently have 0 posts.
|
2013-05-16, 9:20am
|
|
Senior Member
|
|
Join Date: Mar 14, 2012
Location: Bennington, VT
Posts: 1,776
|
|
Quote:
Originally Posted by Liquidsand
Istandalone, how do you get your big, thin maria? Any particular method/tricks? For me, the bigger it gets, the thicker it is. I've tried mashing it all around the edge, but that just ends in a hot mess.
|
while your marvering your maria, take a handheld marver and smoosh around the handle is one way.
another is (if you have an L marver) to use your L marver...it's tough to explain. watch this vid to see how Boxfan (Menzies) does it.
http://www.youtube.com/watch?v=Ih60DlrHELU
__________________
now i've got a Mirage
To view links or images in signatures your post count must be 5 or greater. You currently have 0 posts.
|
2013-05-16, 1:55pm
|
|
Member
|
|
Join Date: Nov 10, 2012
Posts: 64
|
|
I guess technically the tube implosions are a kind of hybrid of the compression and implosion techs. (There's a tutorial in the Boro thread for newbies but I'm on my phone right now.)
I don't start them with a bubble; they are 4 rows of alternating dots on the very end of an open tube. The innermost ring of dots is right on the edge of the tube. You want a clean, even end to start with. I always use the pre- polished ends of my tubes for this, because it saves a step, but if you cut or open up the tube in the flame, as long as you use a clean, thickened edge it will work just as well.
I like to stack the dots with different colors get a little more volume in the implosion. Then you just melt in the dots with the same angles as a compression, closing up the end of the tube, and gently puff to get rid of the dimple which is inside the tube in this case, and flatten the bubble to spread the dots, heat the center to pull them all in to the middle. Put your backing color on and punty to the flattened end of the tube, heating and blowing just above your "disc" to make the glass thin enough to pop a hole and flame cut the edges. (This is known as a disc flip.)
|
2013-05-16, 3:56pm
|
|
Flamewoman
|
|
Join Date: Jan 12, 2007
Location: California
Posts: 985
|
|
Hey Martha ~ Thanks for pictures! What is the red, the very red in the one at the top right? I love red, but most of them are a pain in the a**. I also hate tube. Hard to store it and keep it clean, then hard to clean after it get dusty, etc, etc. I'll stick with rod. I will try that technique that boxfan showed on flattening out the maria. I have that kind of marver on my torch. But size is not really a consideration for me, I work small. My pendants are small, I have made some bigger ones but the small ones sell better.
__________________
Mary K
GTT Sidewinder & 3 Regalias
To view links or images in signatures your post count must be 5 or greater. You currently have 0 posts.
You cannot do a kindness too soon, for you never
know how soon it will be too late.
To view links or images in signatures your post count must be 5 or greater. You currently have 0 posts.
PLEASE like my page!
|
2013-05-16, 5:44pm
|
|
Member
|
|
Join Date: Nov 10, 2012
Posts: 64
|
|
Mary, I think that's Violet Hue .
When I put the Loki's over it it washed out, but when I used it straight on the clear, it struck really red. Unless I got the wrong color somehow.I bought both Violet Medley, which is similar to Stormy Weather, both the rod and it's effects, and Violet Hue, which I didn't label but put in its own jar. What color is your Violet Hue rod?
I also have tried MP American Beauty , Cherry Brandy, and Scarlet Pink. They're all really similar - great reds, but they all seem to do that thing that Amazon Bronze does, where you occasionally get a little chunk of metal on the surface of the glass that fumes around itself. Sometimes looks cool, and sometimes it messes everything up if you're looking for uniformity. But I would recommend any of those three for reds. Also GA half blood and Cherrywood are pretty nice, similar to Cherry Brandy.
|
2013-05-16, 7:58pm
|
|
Flamewoman
|
|
Join Date: Jan 12, 2007
Location: California
Posts: 985
|
|
My Violet Hue is sort of salmon color this batch. I have had batches that were more red pink and they are the ones that
I got the most red from. I love all MP glass, it's always beautiful and easy to work.
I also love Stormy Weather, but the rods I have look nothing at all like the Violet Hue. Stormy weather is sort of
putty colored and I use it for the center petals of this flower, and carmel for outter petals. Staymens are
3 different layered canes. Stormy Weather can be influenced by what glass you put around it, I have found.

If you use stormy weather for one layer of petals and then use
Hycinth for second layer the Stormy weather turns to a pale lavendar, and is beautiful.
__________________
Mary K
GTT Sidewinder & 3 Regalias
To view links or images in signatures your post count must be 5 or greater. You currently have 0 posts.
You cannot do a kindness too soon, for you never
know how soon it will be too late.
To view links or images in signatures your post count must be 5 or greater. You currently have 0 posts.
PLEASE like my page!
|
2013-05-16, 8:37pm
|
|
Senior Member
|
|
Join Date: Oct 06, 2008
Location: SE PA
Posts: 1,996
|
|
I've been getting good color from TAG Reef Red. I'll have to see if my mini compression is out at the studio gallery and bring it home and photograph it.
My best pink so far has been Pink Cadillac (TAG) dipped in Momka American Beautry frit and pulled to a stringer. Another picture I should go find ... lol
Here's the pink: 
And this one is paramore peach that I think I lightly cased in Exotic Citrus

__________________
Laura
To view links or images in signatures your post count must be 5 or greater. You currently have 0 posts.
|
2013-05-17, 6:44am
|
|
Flamewoman
|
|
Join Date: Jan 12, 2007
Location: California
Posts: 985
|
|
Hi Laura, thanks for pictures, nice pendants and love the mellow colors. Especially love that peach one. Don't think I have any paramore glass, might have to remedy that.
__________________
Mary K
GTT Sidewinder & 3 Regalias
To view links or images in signatures your post count must be 5 or greater. You currently have 0 posts.
You cannot do a kindness too soon, for you never
know how soon it will be too late.
To view links or images in signatures your post count must be 5 or greater. You currently have 0 posts.
PLEASE like my page!
|
|
Currently Active Users Viewing This Thread: 1 (0 members and 1 guests)
|
|
|
 Posting Rules
|
You may not post new threads
You may not post replies
You may not post attachments
You may not edit your posts
HTML code is Off
|
|
|
All times are GMT -7. The time now is 4:20am.
|


