

|
| Tips, Techniques, and Questions -- Technical questions or tips |

2010-09-30, 8:59am
|
 |
Ass-kicking Cephalopod
|
|
Join Date: Jun 19, 2006
Location: Duh, Squidville
Posts: 9,523
|
|
No, not confusion - all suggestions welcome! I have seen that one before but I am going to hold off on adding a third layer until I can get a second layer down 
__________________
To view links or images in signatures your post count must be 5 or greater. You currently have 0 posts.
DOG is my co-pilot
Cricket w/two 5 lpm oxycons - and sometimes a Minor.
|
2010-09-30, 10:02am
|
 |
NW Oregon
|
|
Join Date: Aug 31, 2005
Location: NW Oregon
Posts: 940
|
|
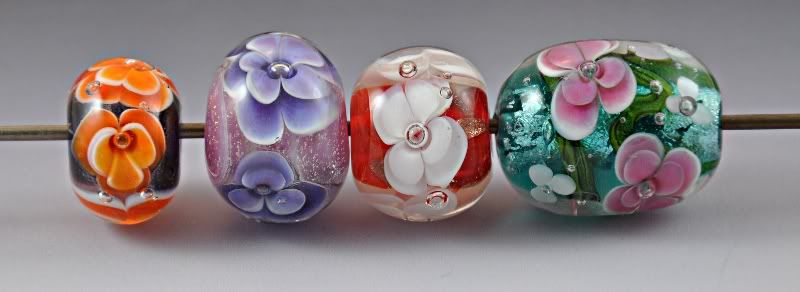
This thread got me thinking about Cynthia's description of dotting the petals and then heating the entire bead and pushing the dotted flowers into the bead. I do have her tutorial and it is a great one by the way. But I think I misunderstood when I read it.
So, I went out to the studio yesterday and tried doing it the way she described versus how I usually do it. Thought I'd post photos so you can see the difference. At least I hope you can see the difference. Cynthia's way does create more depth. Of course, I love all her work so I'm not surprised!
The Blue Flower is my normal way and the Pink flower is her way. If you really look at the center petals in each bead you'll see the difference. The pink ones cup more. In terms of depth *between* the layers of petals I can't see a difference.
Hope this helps to illustrate one aspect of encased florals. Excuse the tiny bubbles around the edge of the pink flowers, I got the pink too hot.
 
 
__________________
To view links or images in signatures your post count must be 5 or greater. You currently have 0 posts.
To view links or images in signatures your post count must be 5 or greater. You currently have 0 posts.
Jennifer
Highland Beads
|
2010-09-30, 12:31pm
|
 |
Run Free Sweet Boy
|
|
Join Date: Jan 29, 2008
Location: Orlando, Fl.
Posts: 2,194
|
|
thanks for this thread, I am working on encased florals right now and got some good tips.... progress is being made.
Candice
__________________
NEW FLAMINGO BEACH BEAD TUTORIAL AVAILABLE NOW.CHRISTMAS ORNAMENT AND ICICLE TUTORIAL, VISIT MY ETSY SHOP AT
To view links or images in signatures your post count must be 5 or greater. You currently have 0 posts.
"It's not what you have, it's who you are."
|
2010-09-30, 4:54pm
|
|
Ass-kicking Cephalopod
|
|
Join Date: Jun 19, 2006
Location: Duh, Squidville
Posts: 9,523
|
|
I was going to take pics today but my battery needed charging. I will try to post them tomorrow.
__________________
To view links or images in signatures your post count must be 5 or greater. You currently have 0 posts.
DOG is my co-pilot
Cricket w/two 5 lpm oxycons - and sometimes a Minor.
|
2010-10-01, 7:49am
|
 |
tweetysweetie
|
|
Join Date: Jun 30, 2005
Location: Alaska, I was here first!
Posts: 1,854
|
|
I'm looking forward to seeing your pics Squid...and I'll second Bousky's tutorial along with Gems &Glassatc advice...I own two sets of Michelles beads and the flowers in them are just incredible AND small...fascinates me as how she gets so much depth & dimension on such a small work canvas.
__________________
I am NOT the authority on anything/everything, but as old as I am... and given the mistakes I've made? I've got a jump on most as to what IS right and what WON'T work!! ~CWeaver 2006
To view links or images in signatures your post count must be 5 or greater. You currently have 0 posts.
To view links or images in signatures your post count must be 5 or greater. You currently have 0 posts.
To view links or images in signatures your post count must be 5 or greater. You currently have 0 posts.
To view links or images in signatures your post count must be 5 or greater. You currently have 0 posts.
|
2010-10-01, 8:51am
|
|
Ass-kicking Cephalopod
|
|
Join Date: Jun 19, 2006
Location: Duh, Squidville
Posts: 9,523
|
|
Quote:
Originally Posted by kimberly

Jennifer - your florals are lovely!!! Beautiful!!
I'd put a plug in for my own floral tutorial, but that would be rude. Plus, there are so many great tutorials out there, it would be pretty pointless.
This has been a nice thread - lots of good advice!
|
Not rude at all - I just went and looked at your tutorial - the flowers are gorgeous and are multi-layer, so I will probably add that to my shopping list if I decide I need another one. Your petals are quite distinctive. Thanks for mentioning it!
__________________
To view links or images in signatures your post count must be 5 or greater. You currently have 0 posts.
DOG is my co-pilot
Cricket w/two 5 lpm oxycons - and sometimes a Minor.
|
2010-10-01, 8:54am
|
|
Ass-kicking Cephalopod
|
|
Join Date: Jun 19, 2006
Location: Duh, Squidville
Posts: 9,523
|
|
I made 2 florals last night. I use the "pressing the slightly raised dots into the bead" trick and left the second layer slightly raised before encasing and I do think it made a difference. I will include those pics too when I take them!
__________________
To view links or images in signatures your post count must be 5 or greater. You currently have 0 posts.
DOG is my co-pilot
Cricket w/two 5 lpm oxycons - and sometimes a Minor.
|
2010-10-01, 9:00am
|
 |
Senior Member
|
|
Join Date: May 23, 2006
Posts: 5,540
|
|
That's great Squid. I was just going to reiterate the importance of the pressing of the petals into the bead. That really keeps the dots from spreading. Also, it has a lot to do with the colors you choose. I almost always use a white base. It seems to spread the least amount. You know what's really pretty? Powder Pink base, with Ruby Gold or Effetre...sh&t, I can't remember the color. OMG I'm getting old. You know, the cranberry trans color? Anyway, it's a killer color flower and it stays nice and crisp.
__________________
Cynthia
To view links or images in signatures your post count must be 5 or greater. You currently have 0 posts.
To view links or images in signatures your post count must be 5 or greater. You currently have 0 posts.
To view links or images in signatures your post count must be 5 or greater. You currently have 0 posts.
|
2010-10-01, 9:03am
|
|
Senior Member
|
|
Join Date: May 23, 2006
Posts: 5,540
|
|
That' it!!! Rubino. I rarely buy the Rubino anymore. I like the Olympic Ruby Gold much better. It doesn't metal up. Thanks, you rescued my brain from trying to remember.
__________________
Cynthia
To view links or images in signatures your post count must be 5 or greater. You currently have 0 posts.
To view links or images in signatures your post count must be 5 or greater. You currently have 0 posts.
To view links or images in signatures your post count must be 5 or greater. You currently have 0 posts.
|
2010-10-01, 10:13am
|
|
NW Oregon
|
|
Join Date: Aug 31, 2005
Location: NW Oregon
Posts: 940
|
|
Quote:
Originally Posted by kimberly
Jennifer - your florals are lovely!!! Beautiful!!
I'd put a plug in for my own floral tutorial, but that would be rude. Plus, there are so many great tutorials out there, it would be pretty pointless.
This has been a nice thread - lots of good advice!
|
Thank you for the compliment Kimberly. I hope I'm not the only one who can see, in my photos, the difference between petals that have been pushed into the surface and petals that are melted flat.
__________________
To view links or images in signatures your post count must be 5 or greater. You currently have 0 posts.
To view links or images in signatures your post count must be 5 or greater. You currently have 0 posts.
Jennifer
Highland Beads
|
2010-10-01, 2:46pm
|
|
Ass-kicking Cephalopod
|
|
Join Date: Jun 19, 2006
Location: Duh, Squidville
Posts: 9,523
|
|
I finally have my photos ready. Here is the "before I started this thread". These are from the last month or so. I got so disgusted that I quit trying to make multi layers and concentrated on making single layer and getting good at those. There are a few that have a single flower that are ok and others that aren't ugly, but don't look "right". And then I started this thread:

Here is after reading some of the first tips - but the one on the far right is from a while ago. See? I can do it on a bigger bead
And here is from last night - and pushing the dots into the bead and leaving the last layer slightly raised when encasing. I used two layers of the transparenton the dots on the top bead but forgot it on the second - I can see the difference.
__________________
To view links or images in signatures your post count must be 5 or greater. You currently have 0 posts.
DOG is my co-pilot
Cricket w/two 5 lpm oxycons - and sometimes a Minor.
|
2010-10-01, 9:40pm
|
 |
Hat or Cake?
|
|
Join Date: Nov 03, 2007
Location: Ontario, Canada
Posts: 610
|
|
This is all very helpful. All of my flowers look way too impressionistic. I'm going to try harder now, using ideas from here.
Squid, your 'before' pictures look much more like flowers than mine do. Honestly. You're doing great. And yes, I do see a big difference in the 'afters.' Spurs me on.
Beth
|
2010-10-02, 6:03am
|
 |
Lampworkaholic!
|
|
Join Date: Apr 22, 2008
Location: Cornelius, NC - because weather
Posts: 5,158
|
|
Quote:
Originally Posted by glassactcc
That' it!!! Rubino. I rarely buy the Rubino anymore. I like the Olympic Ruby Gold much better. It doesn't metal up. Thanks, you rescued my brain from trying to remember.
|
Olympic Ruby Gold? Please tell me where I can get some.
I've been using Reichenbach Gold Violet for my pink flowers but I'd love a deeper pink that is stable and reliable.
__________________
To view links or images in signatures your post count must be 5 or greater. You currently have 0 posts.
"And all will turn to silver glass, a light on the water, grey ships pass into the west." Annie Lennox
|
2010-10-02, 7:15am
|
|
NW Oregon
|
|
Join Date: Aug 31, 2005
Location: NW Oregon
Posts: 940
|
|
Squid your florals are great! It looks like your smaller ones are coming along fine too. And I can really see how the cupping and the extra layer of transparent changed the one bead.
__________________
To view links or images in signatures your post count must be 5 or greater. You currently have 0 posts.
To view links or images in signatures your post count must be 5 or greater. You currently have 0 posts.
Jennifer
Highland Beads
|
2010-10-02, 7:21am
|
|
Mary Lockwood
|
|
Join Date: Jun 21, 2005
Location: Boonies
Posts: 5,831
|
|
I'm diggin the CiM cranberry. Darker than rubino and less moody.
__________________
To view links or images in signatures your post count must be 5 or greater. You currently have 0 posts.
To view links or images in signatures your post count must be 5 or greater. You currently have 0 posts.
To view links or images in signatures your post count must be 5 or greater. You currently have 0 posts.
|
2010-10-02, 7:45am
|
|
Senior Member
|
|
Join Date: May 23, 2006
Posts: 5,540
|
|

These are beautiful. Both of them. I struggled with florals for so long before I started getting the results I wanted. For years I had tried. I'm glad you liked the tutorial  And I'm glad for this thread to go over the process. I don't want anyone who baught the tut, to think I am giving all of the information away here for free. There is LOTS more in the tut
Quote:
Originally Posted by ukiacat
This thread got me thinking about Cynthia's description of dotting the petals and then heating the entire bead and pushing the dotted flowers into the bead. I do have her tutorial and it is a great one by the way. But I think I misunderstood when I read it.
So, I went out to the studio yesterday and tried doing it the way she described versus how I usually do it. Thought I'd post photos so you can see the difference. At least I hope you can see the difference. Cynthia's way does create more depth. Of course, I love all her work so I'm not surprised!
The Blue Flower is my normal way and the Pink flower is her way. If you really look at the center petals in each bead you'll see the difference. The pink ones cup more. In terms of depth *between* the layers of petals I can't see a difference.
Hope this helps to illustrate one aspect of encased florals. Excuse the tiny bubbles around the edge of the pink flowers, I got the pink too hot.
|
__________________
Cynthia
To view links or images in signatures your post count must be 5 or greater. You currently have 0 posts.
To view links or images in signatures your post count must be 5 or greater. You currently have 0 posts.
To view links or images in signatures your post count must be 5 or greater. You currently have 0 posts.
|
2010-10-02, 7:52am
|
|
Senior Member
|
|
Join Date: May 23, 2006
Posts: 5,540
|
|
Yes, there is a definite difference. I think these look really nice. The are nice a crisp around the edges too.
Ok Squid, come on bite the bullet and make the third layer 
Quote:
Originally Posted by squid
I can see the difference.
|
__________________
Cynthia
To view links or images in signatures your post count must be 5 or greater. You currently have 0 posts.
To view links or images in signatures your post count must be 5 or greater. You currently have 0 posts.
To view links or images in signatures your post count must be 5 or greater. You currently have 0 posts.
|
2010-10-02, 7:55am
|
|
Senior Member
|
|
Join Date: May 23, 2006
Posts: 5,540
|
|
I guess it's called Gold Violet.
http://www.glasscolor.com/products/d...D=121&pID=1631
Quote:
Originally Posted by erose
Olympic Ruby Gold? Please tell me where I can get some.
I've been using Reichenbach Gold Violet for my pink flowers but I'd love a deeper pink that is stable and reliable.
|
__________________
Cynthia
To view links or images in signatures your post count must be 5 or greater. You currently have 0 posts.
To view links or images in signatures your post count must be 5 or greater. You currently have 0 posts.
To view links or images in signatures your post count must be 5 or greater. You currently have 0 posts.
|
2010-10-02, 8:49am
|
 |
I speak Murrini!
|
|
Join Date: Oct 12, 2006
Location: In a Glass House, CA
Posts: 9,170
|
|
Wow, Squid...they're coming along GREAT! I need to subscribe to this thread!!!! My efforts look quite like your "before" pictures; can it be that second layer of transparent over the opaque dots is the magic ticket?
I really must try again! They are all really pretty but I think I like that orange one on the far left most; it looks like a Pansy!
__________________
~DeAnne~
I've got a murrini for that,'ya know!
To view links or images in signatures your post count must be 5 or greater. You currently have 0 posts.
"Only a fool rushes to his own demise..." ~Zorro
|
2010-10-02, 7:52pm
|
|
Ass-kicking Cephalopod
|
|
Join Date: Jun 19, 2006
Location: Duh, Squidville
Posts: 9,523
|
|
Quote:
Originally Posted by glassactcc
Yes, there is a definite difference. I think these look really nice. The are nice a crisp around the edges too.
Ok Squid, come on bite the bullet and make the third layer |
Funny you should mention that  . I was planning on trying it tonight but was too tired from painting all day to torch. I will definitely be trying next time I torch though.
Thank you, Cynthia and everyone else too, SO MUCH for all your help. I am pretty happy with my progress so far.
__________________
To view links or images in signatures your post count must be 5 or greater. You currently have 0 posts.
DOG is my co-pilot
Cricket w/two 5 lpm oxycons - and sometimes a Minor.
|
2010-10-02, 7:54pm
|
|
Ass-kicking Cephalopod
|
|
Join Date: Jun 19, 2006
Location: Duh, Squidville
Posts: 9,523
|
|
Quote:
Originally Posted by theglasszone
Wow, Squid...they're coming along GREAT! I need to subscribe to this thread!!!! My efforts look quite like your "before" pictures; can it be that second layer of transparent over the opaque dots is the magic ticket?
I really must try again! They are all really pretty but I think I like that orange one on the far left most; it looks like a Pansy! |
Thank you! It's 3 things combined - the second trans layer is one, the pushing the first layer of dots down into the beads is second, and leaving the top layers slightly raised before encasing is third. All three seem to have made a difference!
__________________
To view links or images in signatures your post count must be 5 or greater. You currently have 0 posts.
DOG is my co-pilot
Cricket w/two 5 lpm oxycons - and sometimes a Minor.
|
2010-10-02, 7:57pm
|
|
Ass-kicking Cephalopod
|
|
Join Date: Jun 19, 2006
Location: Duh, Squidville
Posts: 9,523
|
|
Quote:
Originally Posted by ukiacat
This thread got me thinking about Cynthia's description of dotting the petals and then heating the entire bead and pushing the dotted flowers into the bead. I do have her tutorial and it is a great one by the way. But I think I misunderstood when I read it.
So, I went out to the studio yesterday and tried doing it the way she described versus how I usually do it. Thought I'd post photos so you can see the difference. At least I hope you can see the difference. Cynthia's way does create more depth. Of course, I love all her work so I'm not surprised!
The Blue Flower is my normal way and the Pink flower is her way. If you really look at the center petals in each bead you'll see the difference. The pink ones cup more. In terms of depth *between* the layers of petals I can't see a difference.
Hope this helps to illustrate one aspect of encased florals. Excuse the tiny bubbles around the edge of the pink flowers, I got the pink too hot.
|
Both of these beads are incredibly gorgeous!!!!!!
__________________
To view links or images in signatures your post count must be 5 or greater. You currently have 0 posts.
DOG is my co-pilot
Cricket w/two 5 lpm oxycons - and sometimes a Minor.
|
2010-10-03, 12:01am
|
 |
To Bead Or Not To Bead
|
|
Join Date: Jun 15, 2005
Location: Livonia, Michigan
Posts: 2,089
|
|
I've been making florals for awhile and they look ok, but I do have one question that bugs the heck out of me. I have made some pretty cool stamen cane. When I apply it on top of a flower that has all the layers as mentioned above and plunge and leave it raised and cut it off with nippers, it spreads out and makes a hole and really ruins my flower. Any pointers on how to avoid this?
__________________
Etsy:
To view links or images in signatures your post count must be 5 or greater. You currently have 0 posts.
Ebay:
To view links or images in signatures your post count must be 5 or greater. You currently have 0 posts.
|
2010-10-03, 4:46am
|
 |
Wendy
|
|
Join Date: Jun 19, 2007
Location: Raleigh, NC
Posts: 1,143
|
|
Squid posted bead pics!
*faints*
I kept popping in here to see your progress and am amazed at even your before pics. Thanks for starting this thread and thanks to everyone that's posted tips along the way. There's so much information here!
__________________
To view links or images in signatures your post count must be 5 or greater. You currently have 0 posts.
Quote:
|
... Although that's probably part of what makes an artist a true artist.. you create things that you like and then wonder if anyone else could possibly like them without having seen the rest of the story that's still in your head. ~Me
|
|
2010-10-03, 5:56pm
|
|
Mary Lockwood
|
|
Join Date: Jun 21, 2005
Location: Boonies
Posts: 5,831
|
|
Quote:
Originally Posted by killerbeedz1
I've been making florals for awhile and they look ok, but I do have one question that bugs the heck out of me. I have made some pretty cool stamen cane. When I apply it on top of a flower that has all the layers as mentioned above and plunge and leave it raised and cut it off with nippers, it spreads out and makes a hole and really ruins my flower. Any pointers on how to avoid this?
|
Pull the end of your stamen cane to a point before you plunge it into the bead.
Heat the tip and pull it off like you were cleaning the tip off a dirty rod of clear. Leave the end tapered and pointy. When you plunge it into the bead it won't have as far to spread deep down when you go to melt it in.
~~Mary
__________________
To view links or images in signatures your post count must be 5 or greater. You currently have 0 posts.
To view links or images in signatures your post count must be 5 or greater. You currently have 0 posts.
To view links or images in signatures your post count must be 5 or greater. You currently have 0 posts.
|
2010-10-03, 6:01pm
|
|
Ass-kicking Cephalopod
|
|
Join Date: Jun 19, 2006
Location: Duh, Squidville
Posts: 9,523
|
|
Quote:
Originally Posted by killerbeedz1
I've been making florals for awhile and they look ok, but I do have one question that bugs the heck out of me. I have made some pretty cool stamen cane. When I apply it on top of a flower that has all the layers as mentioned above and plunge and leave it raised and cut it off with nippers, it spreads out and makes a hole and really ruins my flower. Any pointers on how to avoid this?
|
When I use stamen cane, I dot the cut end with clear and let it spread the end of the stamen out a little. If it's a little long, I heat the clear end and press it down carefully.
__________________
To view links or images in signatures your post count must be 5 or greater. You currently have 0 posts.
DOG is my co-pilot
Cricket w/two 5 lpm oxycons - and sometimes a Minor.
|
2010-10-03, 6:07pm
|
|
Ass-kicking Cephalopod
|
|
Join Date: Jun 19, 2006
Location: Duh, Squidville
Posts: 9,523
|
|
Quote:
Originally Posted by Bluejeangirlnc
Squid posted bead pics!
*faints*
I kept popping in here to see your progress and am amazed at even your before pics. Thanks for starting this thread and thanks to everyone that's posted tips along the way. There's so much information here!
|
I really *DO* make beads!
__________________
To view links or images in signatures your post count must be 5 or greater. You currently have 0 posts.
DOG is my co-pilot
Cricket w/two 5 lpm oxycons - and sometimes a Minor.
|
2010-10-03, 7:35pm
|
 |
honorary bead lady
|
|
Join Date: Jan 14, 2008
Location: Mostly the doghouse
Posts: 5,180
|
|
Quote:
Originally Posted by squid
I really *DO* make beads!
|
Yes and now there is proof!
__________________
David
To view links or images in signatures your post count must be 5 or greater. You currently have 0 posts.
|
2010-10-03, 8:12pm
|
|
Ass-kicking Cephalopod
|
|
Join Date: Jun 19, 2006
Location: Duh, Squidville
Posts: 9,523
|
|
I've posted them before - three or four times
__________________
To view links or images in signatures your post count must be 5 or greater. You currently have 0 posts.
DOG is my co-pilot
Cricket w/two 5 lpm oxycons - and sometimes a Minor.
|
2010-10-03, 11:02pm
|
|
To Bead Or Not To Bead
|
|
Join Date: Jun 15, 2005
Location: Livonia, Michigan
Posts: 2,089
|
|
Thanks for the tips Mary and Squid. I'll give it a try next time I do florals.
Patsy
__________________
Etsy:
To view links or images in signatures your post count must be 5 or greater. You currently have 0 posts.
Ebay:
To view links or images in signatures your post count must be 5 or greater. You currently have 0 posts.
|
|
Currently Active Users Viewing This Thread: 1 (0 members and 1 guests)
|
|
|
 Posting Rules
|
You may not post new threads
You may not post replies
You may not post attachments
You may not edit your posts
HTML code is Off
|
|
|
All times are GMT -7. The time now is 1:40pm.
|


