
This is copy/pasted from my blog and therefore has a conversational tone. I couldn't figure out how to make the links work the same way here but there are links at the blog and if you find this tutorial useful I'd love for you to follow my blog, the link is in my siggie, thanks!
Copies exist in both places because it was discussed elsewhere on this forum that blogs have a way of disappearing. I am only allowed 16 images per post on LE so there are images on my blog that do not appear here. This way there is a permanent record on LE. If you do something as a result of this tutorial please post it, I'd love to see it!
Wrap that wire!
First a quick disclaimer (you knew there had to be one):
The methods in this blog are not the only ways or the best ways, they are my ways. So many people have shared so much of their knowledge over the internet with me and I'm just trying to give back in some small way.
My tool reviews are
my opinion. Your mileage may vary.
WEAR SAFETY GLASSES! Always protect your eyes.
I wear my normal glasses and also an optivisor because I do tiny work frequently.
There comes a time when you are up to your earlobes in sparklies and you realize that you really should be doing something with them. You're tired of just stringing or having your beads in a box or on a shelf and you long to do something more substantial. I understand, I've been there. Then, one day you're in the store or on the 'net and you run across something called..........
Wire wrapping
Oh my. So you find some cheap pliers (because you don't want to invest money until you are sure you will like this new thing you've found) and you buy some craft wire and do a little reading online or in a magazine and try your hand at it. Now, I don't know about you but my first attempts at wire wrapping were abysmal. They looked like sterling silver hairballs and here is the first piece of advice:
DON'T start with sterling.
Copper is good. Copper is inexpensive (relatively) and you can find refiners who will pay you for your used copper. Until you have some time with the right tools under your belt leave the expensive materials alone.
I, of course, was ever the idiot who immediately bought sterling wire from the bead shop. Yeah. I'm sending over a pound of scrap wire to the refiners tomorrow which is what remains of my first year of pendant making. Silver costs have gone up though so maybe for me it will turn out to be all good. At today's silver prices though, really, start with copper or any of the fun colored wire out there. Parawire has some fun colors at good prices in my opinion (a quick click showed me $6.60 for 50 feet of wire, that's a lot of practicing for under 10 bucks).
So, you've decided on wire, what's next? Ah, tools.......... let me wipe the drool from my chin and we'll talk.
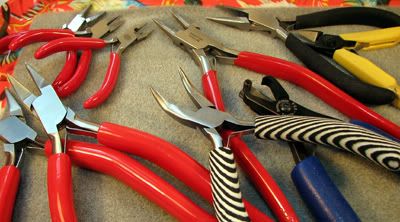
I am, as you can see, a tool junkie:
What did I start with? Alright, I'll fess up, I can be really cheap sometimes:
It's OK to laugh, really it is. If you think the tool is funny you should see what the wire looked like. These puppies actually turned out to be really useful in their second life as mandrel holders when I'm pulling beads off as you can see by the the ooky (yes, it's a word - shut up) bead release all over the teeth and base.
I learned pretty fast - cheap Home Depot pliers with teeth + sterling wire = aaaaaaaaaaaargh
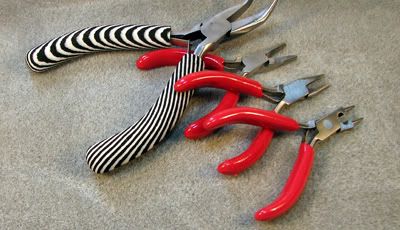
So I upgraded to an actual set! The only set my bead store had at the time and I was told they were for "general wireworking use". They're those three itsy red ones:
Can you say hand fatigue? I knew that you could. The nicely sized zebra striped bent nose pliers are actually the newest tool in my arsenal and I have to say that I'm impressed. They are #JT1006 from CGBeads and when I saw that Donna's site was offering tools I knew I had to try them. Kara is actually responsible for these and I am so grateful that she decided to make us these wonderful tools. Donna makes beadrollers and from product to customer service I have found doing business with this company to be a joy. With their products it's never "should I risk it?" for me, but rather "what can I hock so I can get some more of those?". I don't work for the company nor am I affiliated with it but I believe in supporting small business, especially when it's someone who goes the extra mile for their customers.
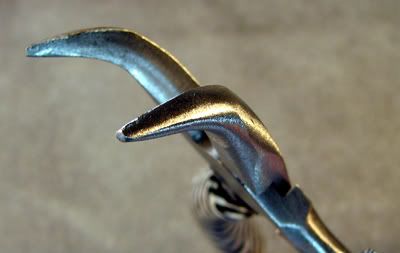
But I digress. What makes this pair of bent nose pliers better than others I've tried? Well actually, I can show you.
The finish on this tool is a thing of beauty. Slick, smooth, and not a mar, bump, blemish, or scratch in sight. The grips are just as comfortable as they look and the tool has good balance. It feels great in my hand and I don't have to work hard to use it. That's important to me, I'm not a fan of hand pain.
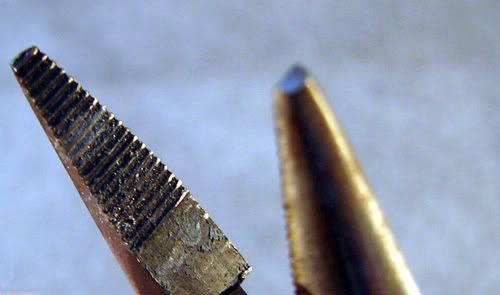
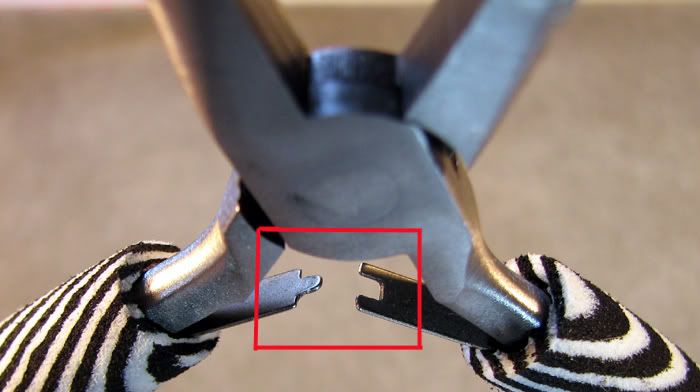
Now, let's look closely at another detail that someone new to wireworking might think is inconsequential but I feel makes a huge difference over time.
You want this:
Not this:
Why? Because that little nest on the CG pliers will keep the pliers in true. It may look like a small thing but it makes a big difference. I've reached a point where nothing irritates me more than floppy, misaligned tools. I find it especially vexing when I'm working in miniature (doll jewelry, a blog on that in the future) and the entire piece is smaller than a quarter. Small deviations make for huge mistakes at that scale.
So now we've had a tool review. What are the essential tools for wireworking?
Good cutters: I have Lindstroms and they're awesome but they also cost $54.50. They were a requirement for a metalsmithing class. I've never regretted the purchase but if you're on a budget or just starting out that can be a bit pricey. Kara's cutters (#JT1001 side and #JT1002 end) at CGBeads are $19.95 and having tried the pliers I have no doubt they're wonderful, I plan to get a pair or two. A girl can never have enough cutters.
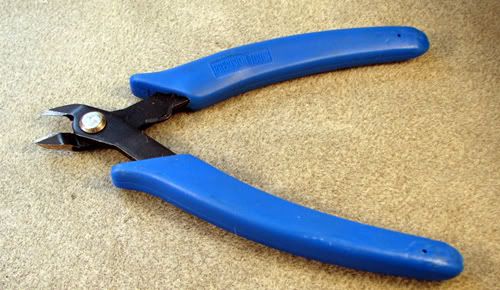
I can show you what I do not recommend in a wire cutter:
I know these, again, came from a local bead store. The name on the handle is 'precision tools'. Not to be catty, but I beg to differ (OK, so, a little catty). I have two pair of these. Why I bought them twice I'll never know, I'm calling brain freeze. I've never cut any wire larger than 18 gauge and these have divots all along the cutting edge like I was trying to cut mandrel steel with them. The other day I misplaced my Lindstroms and in desperation grabbed a pair of these to cut open a closed jump ring. They left about a one mm gap in the ring, it's like they eat metal. You know that place where all the disappearing socks go? These send my silver there. Just don't do it, you deserve better. I think the outlay for these at the bead store was around 15 bucks.
A pair each of round nose, bent nose, chain nose and flat nose pliers. If you plan on doing chain maille I would recommend two pair of flat nose pliers just because that's what works best for me. I've done chain maille with a pair of chain nose and a pair of flat nose but I'm just too OCD to be happy that way. When it comes to tools I'm a very matchy matchy kind of gal.
One last word on tools: Now that you have the tools with the wonderful finish you want to keep them that way. I blogged about this in my last post but it bears mentioning again.
Tool Magic. Seriously. Get this stuff and dip your tools in it. Protect your wire AND your tools.
If you are curious the red handled tools in my pictures are a brand called Mazbot (made in Pakistan on the handle) that one of my local bead stores carry. They cost around $20.00 and the padding on the handles is not great. They haven't been the worst but I'm certainly ready to upgrade. On the upside I've used Tool Magic since most of these were purchased and they still have the finishes they had when I picked them up in the store.
You also want a good file.
Why? Because unfiled wire is sharp and scratchy. It can scratch your customer or catch on her $600 cashmere sweater ripping the collar as she flails around your booth screaming about lawsuits and..........
OK, too much? How about if you are are going to work hard to make a quality piece then finish it in a quality way. File the ends of your wire and tuck them down. No debate. It's like annealing beads in a kiln. You know you should do it so just do it.
I think that covers tools. I want to make a pendant today so I'm also needing my other supplies.
Sterling silver wire (for ME, not for you, not yet), a pair of those whatever they are, bead scoop/tweezer combo thingy - I can't do anything delicate without them, some sterling silver jumprings, miyuki delicas (11.0 glass beads - and I'll do a blog on seed bead sizes later too), and, of course, a lovely lampwork bead. I purchased this particular bead from NaOs Glass and Jewelry Supply awhile back and I just love it. I've been meaning to make a pendant from it for awhile and this gave me the chance, finally.
Next we're going to talk about the Swanstrom small wire-looping pliers:
When I bought mine I also bought the kit . Both together will run you about 100 bucks. Yes, I know it's pricey. I don't care, I love these, they are awesome in they're awesomeness but not for the reason you think. I don't use them for loops. They make oval loops and call me weird but I'm a freak for round loops in my wire wrapping. However, when it comes to making a bail I think these are the best thing since sliced bread. To use them for bail making you need the kit. A bonus to that is you can also make gorgeous spirals with the kit.
To make the bail the instructions that come with the wire-looping pliers say you need 12" of wire. This is sterling. I cut 9".
When you cut wire, especially when it's been on a spool or coiled it's not straight. You really want to work with straight wire. So, after I cut mine I straighten it by holding the wire end in one hand and pulling the wire throught a rouge or polishing cloth a few times. This not only straightens the wire but cleans it as well.
Yes, mine is grubby. You use these until they wear out, you never wash them, just throw them away. They last a loooong time and at 6 bucks or so each it's worth having one.
Next you want to wrap your wire around a 5/16 mandrel twice. Hmmmm. I don't know about you but just about everything in my shop is metric. So I took the metric mandrels off my Pepe Jump Ringer and compared and 5/16 is just about 5mm, give or take. I'm sure someone out there is better with math than I am. I used a 5mm mandrel and it worked and I'm happy, end of story.
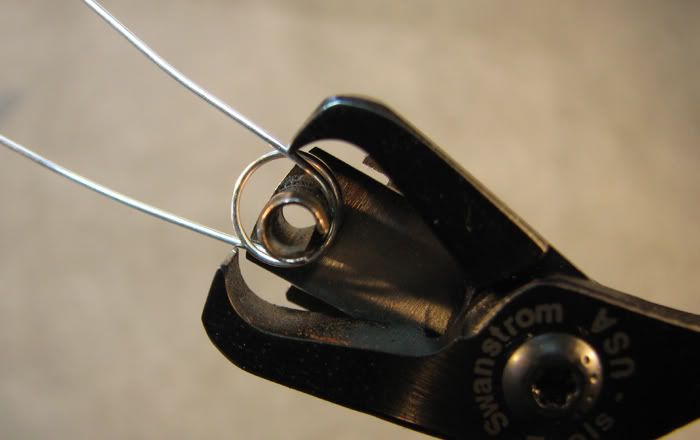
Now you put that double loop (you're making a double looped bail) onto the wire-looping pliers, like so:
and then you pinch that sucker shut.
After you pinch the pliers shut on the wire you hold it in place and make your wraps. Do you see that the end of my wire hanging down looks all bendy? That's because I used chain nose pliers to hold the wire. The wire-looping plier instructions say to hold onto the wire and spin the wire-looping pliers to make the wraps but I am NOT that coordinated and I kept dropping the things and saying unkind words in the privacy of my studio so I just hold the wire-looping pliers still, pick up chain nose pliers with the other hand, grab the end of the wire I want to wrap with and wrap away.
Or you can take the wire off the wire-looping pliers entirely and just hold the bail in flat nose pliers, both ways are equally efficient in my opinion. While I will always read instructions I am not married to them and often find my own way because I'm left-handed. You learn at an early age that approaching tasks from a different angle is essential to your survival in a right-handed world.
I can't stress this enough:
practice making your wraps tight. They should lay right next to each other in a nice uniform pattern. If you make your wraps and there are gaps take your chain nose pliers and
carefully use them to squeeze the wraps together. Certain jewerly designs call for deconstructed arbitrary loose wraps which can be beautiful but before you go out of the box you should learn to make everything in the box neat first.
Like anything else this bail maneuver takes practice. It doesn't take long to get the hang of it though and it's well worth the effort because once you master it you can crank bails out at a good pace. It's a wonderful tool for production work.
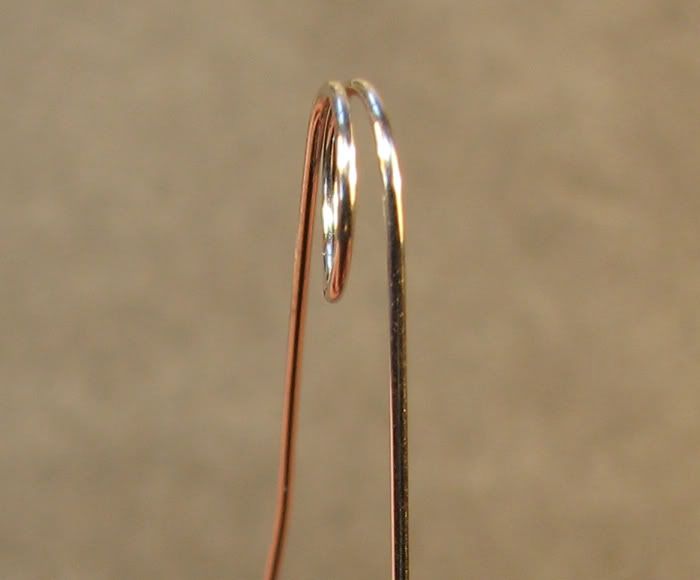
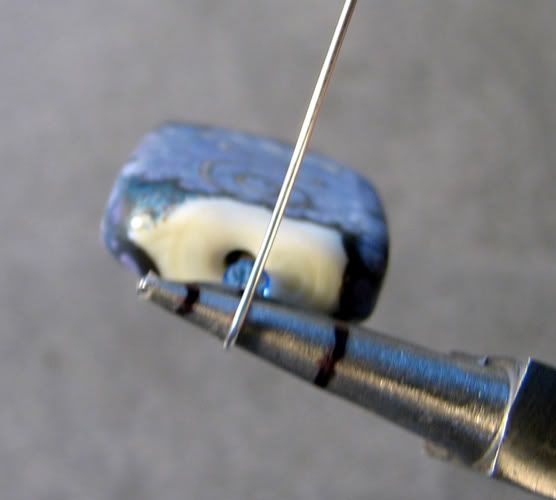
So the closed bail is wire wrapped, how to do open it without using your fingernails and teeth? Most bead stores have thin metal rulers like the one pictured. This has a prized position on my table and has retired from it's former measuring occupation and is now solely my bail opening tool. Just slide it between the two wires and bend.
and there you go! An added bonus is if the bead has a hole larger than 1/16 the wire-wrapped portion slides right down into the bead and helps to stabilize it.
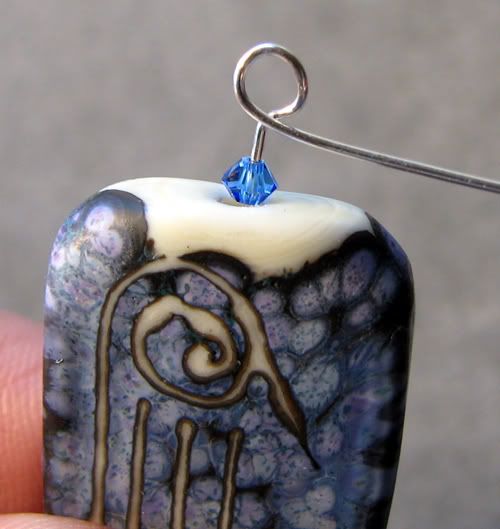
What if your pendant is still wobbly on the wire at this point? That's what I use delicas for although I've also used other sizes of seed or sterling beads. Find some small beads that fit around the wire but will still slide into the bead hole. This will fill the gap and your lampwork bead won't wobble.
I used a little swarovski crystal at the end for a bit of sparkle and to fill the last of the lampwork bead hole:
We still need to make the bottom loop to complete wire-wrapping the pendant. You will see that I mark my tools. Since I use Tool Magic I'm actually marking on that. Time and practice will teach you how wide on the chain nose pliers is about 3 wraps (or whatever you get comfortable with) long. Grab the wire just below the crystal
pushing the crystal snugly into the lampwork bead. Now you want to bend the wire in a 90 degree angle. Then pick up your round nose pliers:
I mark my round nose pliers too. I move my plier placement during this process and the lines help me stay exactly where in need to be to achieve a round wrap. Wrap halfway around one side of the plier and stop.
Slide your pliers around halfway until the half loop you just made is between the two points of the pliers, grab the end of the wire with your fingers or your chain nose pliers and wrap it snugly to form the rest of the loop. I like to use chain nose pliers and give the end of the wire a good smooth tug when I complete the loop to take out any slack that could make the loop uneven.
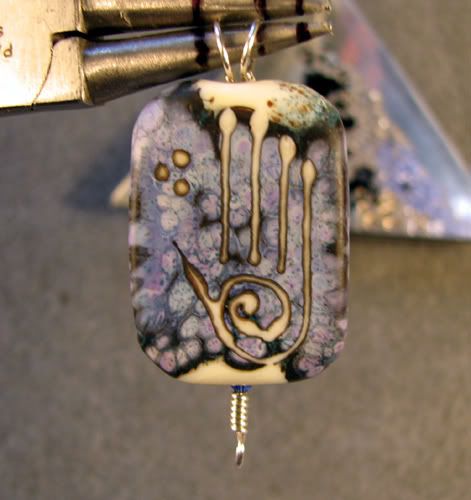
And there it is:
Wrap the wires just as you did with the bail making sure they are snugged up nicely together.
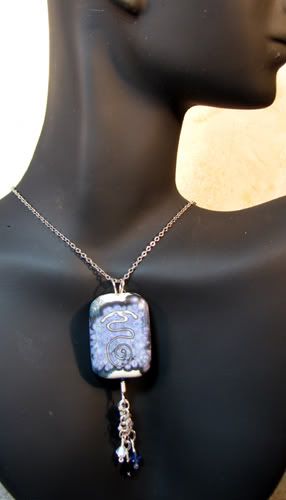
Finished!
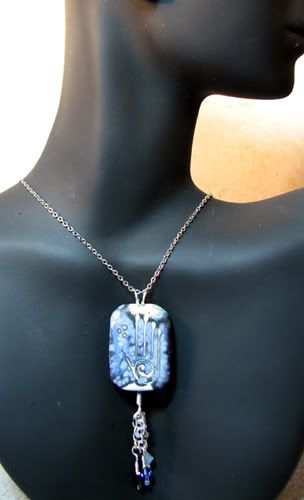
Because the wire-wrapped part of the bail is tucked into the lampwork it snugged into the bead well and the bead does not turn. It's static which I love. This is a two-sided bead so depending on what kind of energy I need that day and I can wear it like this:
Or like this!
Thanks for reading and happy wrapping!


 It is not a thing of beauty.


