

|
| Tips, Techniques, and Questions -- Technical questions or tips |

2011-11-01, 9:51am
|
 |
Senior Member
|
|
Join Date: May 11, 2009
Location: Massachusetts...I95 south...before Rhode Island
Posts: 2,006
|
|
 Peppermints
Uggghhh! I'm driving myself crazy trying to make these! It should be simple enough to make them, right? I've been making straight sided lentils, placing red across them, reheating, poking and finally twisting.
They are ALL turning out like crap. I know PPP but this experiment isn't going anywhere.
HELP!!!!
Thanks
Duane
__________________
ETSY SHOP IS NOW OPEN
To view links or images in signatures your post count must be 5 or greater. You currently have 0 posts.
REVAMPED WEBSITE NOW OPEN
To view links or images in signatures your post count must be 5 or greater. You currently have 0 posts.
|
2011-11-01, 9:54am
|
 |
state-eternal change
|
|
Join Date: Sep 09, 2006
Location: Sunnyvale CA
Posts: 710
|
|
Try pressing after adding the color stripes and twisting maybe? What exactly is it that is unsatisfying about your results?
__________________
To view links or images in signatures your post count must be 5 or greater. You currently have 0 posts.
|
2011-11-01, 9:55am
|
 |
Uh Oh....
|
|
Join Date: Dec 06, 2005
Posts: 1,039
|
|
Do you have some pictures of those crappy peppermints? We need to see them to see what you're doing wrong. It sounds like what you are doing should work just fine.
__________________
Susan
To view links or images in signatures your post count must be 5 or greater. You currently have 0 posts.
|
2011-11-01, 10:57am
|
|
Senior Member
|
|
Join Date: May 11, 2009
Location: Massachusetts...I95 south...before Rhode Island
Posts: 2,006
|
|
Well, maybe they're not THAT bad and maybe my hand-eye coordination wasn't in sync earlier....
I put them straight into my wonkie bucket so they may look a little chomped on already.

Duane
__________________
ETSY SHOP IS NOW OPEN
To view links or images in signatures your post count must be 5 or greater. You currently have 0 posts.
REVAMPED WEBSITE NOW OPEN
To view links or images in signatures your post count must be 5 or greater. You currently have 0 posts.
|
2011-11-01, 11:01am
|
 |
Meet Molly
|
|
Join Date: Feb 01, 2007
Location: Pensacola, FL.
Posts: 178
|
|
Robin (FosterFire) posted a while ago sketches with instructions and then finally peppermint photos. I saved it in my Lampwork Tutorials and Info. folder on my desktop but forgot to include the URL address. So instead, I'll copy it and paste it here.
I'm sure this will help you out. But remember, this is Robin's work, not mine...she deserves all the credit!
Neomi
Christmas Peppermints Diagrams & Directions- by Robin Foster (FosterFire on LE)
Here are some of the tips to making a very neat looking peppermint:
1. Make the base using a press, such as Zoozii's Straight Sided Lentil.
2. Start your stringer in the middle of the bead to the outer edge, then back to the middle to the outer edge and go all the way around the equator.
3. Make sure all the starts and stops are in the center of each side.
4. As shown in the diagram, do your diagonals one side at a time. I make my bead in the middle of the mandrel, so once one side of the bead has it's stripes I can trade hands and do the other side of the bead. So do all the diagonals on one side completely first and then on start the other side of the bead.
5. The half-length stripe that goes straight up to the mandrel is where you want to tuck in the melty end towards the mandrel with a tungsten or stainless steel pick.
6. Now you have a fairly congested intersection in the middle of your bead, so heat that little area and gently tweeze off the excess.
7. Allow the glass to relax back into the center. It should leave you a small open area for your twirl. You can re-press if necessary, but remember to get rid of any chill marks.
8. Heat center. Using stringer, stab, twist gently, blow, break off stringer. Now do the other side.
9. Add clear ends for candy wrapper, if desired.
Pics didn't come up no matter what I tried. Sorry about that. If you'd like to have them, pm me with your e-mail and I'll attempt forwarding the file to you or maybe you can pm Robin for them. Enjoy making Peppermints!
Robin Foster - plays with fire and a rock hammer!!
FosterFire Glass Art, www.fosterfireglass.com
|
2011-11-01, 11:05am
|
 |
Smile, it's contagious!
|
|
Join Date: Oct 31, 2005
Location: Location: Location
Posts: 4,938
|
|
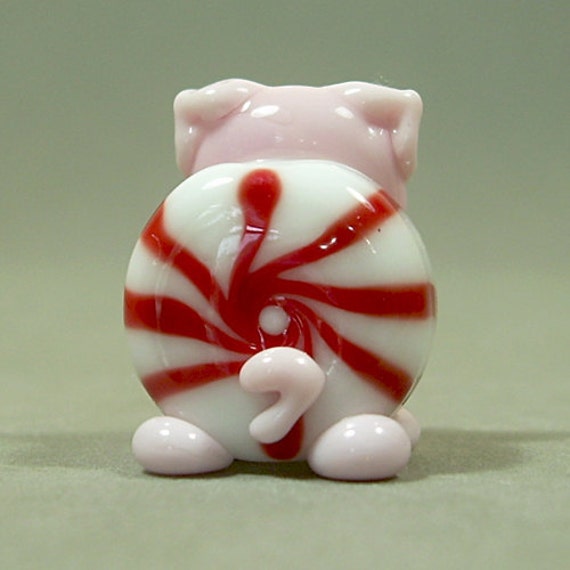
I think I do it the same way you are doing it.
Make a white bead
press
add very thin red stringer
melt in (you may want to press again at this stage so when you heat & twist, the whole bead isn't mushy)
heat center
twist with white stringer
gently reheat
press
remove chill marks
... then add the pig parts for a pigmint.

__________________
Squid says I'm a special kind of Bithc. To view links or images in signatures your post count must be 5 or greater. You currently have 0 posts.
To view links or images in signatures your post count must be 5 or greater. You currently have 0 posts.
To view links or images in signatures your post count must be 5 or greater. You currently have 0 posts.
To view links or images in signatures your post count must be 5 or greater. You currently have 0 posts.
To view links or images in signatures your post count must be 5 or greater. You currently have 0 posts.
To view links or images in signatures your post count must be 5 or greater. You currently have 0 posts.
To view links or images in signatures your post count must be 5 or greater. You currently have 0 posts.
To view links or images in signatures your post count must be 5 or greater. You currently have 0 posts.
Some people are like a Slinky... not really good for anything, but you still can't help but smile when you shove them down the stairs.

|
2011-11-01, 11:06am
|
|
state-eternal change
|
|
Join Date: Sep 09, 2006
Location: Sunnyvale CA
Posts: 710
|
|
Yeah, I don't think they look bad at all! I would suggest heating the red stripes more slowly, and remember to strike the red a few times (cool to no glow, then warm up a few times). That should lessen the orange/yellow tones. If you want no bleeding of the red into the white, try giving your red rod a thin encasement of clear before you pull it out into stringer.
You could try a darker red too if you like.
__________________
To view links or images in signatures your post count must be 5 or greater. You currently have 0 posts.
|
2011-11-01, 11:07am
|
|
state-eternal change
|
|
Join Date: Sep 09, 2006
Location: Sunnyvale CA
Posts: 710
|
|
Aw, what a cute piggie!
__________________
To view links or images in signatures your post count must be 5 or greater. You currently have 0 posts.
|
2011-11-01, 11:08am
|
|
Smile, it's contagious!
|
|
Join Date: Oct 31, 2005
Location: Location: Location
Posts: 4,938
|
|
Thanks Jody! 
__________________
Squid says I'm a special kind of Bithc. To view links or images in signatures your post count must be 5 or greater. You currently have 0 posts.
To view links or images in signatures your post count must be 5 or greater. You currently have 0 posts.
To view links or images in signatures your post count must be 5 or greater. You currently have 0 posts.
To view links or images in signatures your post count must be 5 or greater. You currently have 0 posts.
To view links or images in signatures your post count must be 5 or greater. You currently have 0 posts.
To view links or images in signatures your post count must be 5 or greater. You currently have 0 posts.
To view links or images in signatures your post count must be 5 or greater. You currently have 0 posts.
To view links or images in signatures your post count must be 5 or greater. You currently have 0 posts.
Some people are like a Slinky... not really good for anything, but you still can't help but smile when you shove them down the stairs.
|
2011-11-01, 2:34pm
|
 |
Practicing perfect
|
|
Join Date: Oct 12, 2007
Location: Fullerton, CA
Posts: 2,050
|
|
Quote:
Originally Posted by Gelly

I think I do it the same way you are doing it.
Make a white bead
press
add very thin red stringer
melt in (you may want to press again at this stage so when you heat & twist, the whole bead isn't mushy)
heat center
twist with white stringer
gently reheat
press
remove chill marks
... then add the pig parts for a pigmint.
|
This little guy is just too darn cute.
Just saw a picture somewhere showing the peppermints and now instructions on how to make them awesome! thank you for sharing.
__________________
Inez
In the hopes of reaching the moon men fail to see the flowers that blossom at their feet - Albert Schweitzer
To view links or images in signatures your post count must be 5 or greater. You currently have 0 posts.
|
2011-11-01, 3:59pm
|
 |
Sheila Davis Designs
|
|
Join Date: May 23, 2009
Location: Olympia
Posts: 3,351
|
|
I do mine almost like that..only I do the stripe from hole to hole first,melt partway and tuck in the ends. Then I do the equator stripe, but don't cross the other stripe. Then do the diagonal stripes starting in the middle and going all th way around to the other side.Slowly melt all this in and press again. Then do the twist! Make sure your lentil is a little small to begin with too.
__________________
To view links or images in signatures your post count must be 5 or greater. You currently have 0 posts.
To view links or images in signatures your post count must be 5 or greater. You currently have 0 posts.
To view links or images in signatures your post count must be 5 or greater. You currently have 0 posts.
|
2011-11-01, 4:01pm
|
|
Sheila Davis Designs
|
|
Join Date: May 23, 2009
Location: Olympia
Posts: 3,351
|
|
Here's pic of mine...
__________________
To view links or images in signatures your post count must be 5 or greater. You currently have 0 posts.
To view links or images in signatures your post count must be 5 or greater. You currently have 0 posts.
To view links or images in signatures your post count must be 5 or greater. You currently have 0 posts.
|
2011-11-01, 6:02pm
|
 |
SCIENCE Teacher!
|
|
Join Date: Jul 19, 2005
Location: Wylie, TX
Posts: 2,140
|
|
How funny! I was wondering if this was still around someplace..!
__________________
Yes, I am FosterFire Bead Release.
|
2011-11-01, 6:12pm
|
 |
Wendy
|
|
Join Date: Jun 19, 2007
Location: Raleigh, NC
Posts: 1,143
|
|
__________________
To view links or images in signatures your post count must be 5 or greater. You currently have 0 posts.
Quote:
|
... Although that's probably part of what makes an artist a true artist.. you create things that you like and then wonder if anyone else could possibly like them without having seen the rest of the story that's still in your head. ~Me
|
|
2011-11-02, 7:01am
|
|
Senior Member
|
|
Join Date: May 11, 2009
Location: Massachusetts...I95 south...before Rhode Island
Posts: 2,006
|
|
I've noticed a few things with my first attempts at making these. First, I think I was placing too many red lines (and I was doing ONE side at a time) second, I wasn't melting the lines in and gently pressing before twisting.
I made a few quick tests ( non annealled, thrown under fiber blanket) last night. They turned out significantly better. I'll try some more real ones tonight. I also noticed if I slow down my stringer control (or lack thereof) a bit things will be a bit cleaner
Duane
__________________
ETSY SHOP IS NOW OPEN
To view links or images in signatures your post count must be 5 or greater. You currently have 0 posts.
REVAMPED WEBSITE NOW OPEN
To view links or images in signatures your post count must be 5 or greater. You currently have 0 posts.
|
|
Currently Active Users Viewing This Thread: 1 (0 members and 1 guests)
|
|
|
 Posting Rules
|
You may not post new threads
You may not post replies
You may not post attachments
You may not edit your posts
HTML code is Off
|
|
|
All times are GMT -7. The time now is 1:37pm.
|


